How to Make a Needlepoint Bookmark From Scratch (Without Spending $45 on a Painted Canvas)
There is something wildly satisfying about turning a blank piece of mesh into a custom bookmark you actually want to use every day. And honestly? Once you realize painted canvases can cost $45+ before thread and finishing… you start getting creative real fast.
I started teaching myself how to make stitch-counted bookmarks from screenshots and Etsy inspiration, and now I’m obsessed. If you can count squares and make repetitive stitches, you can absolutely do this. ✨
Please note: there are some affiliate links in here and some things that aren't commission, its just what we use and love! These links help keep this blog ad free for your enjoyment <3
Also comment below if you end up laughing like I did at the backgrounds of these photos as you go! HAHAHA
Talk about REAL LIFE happening around your projects!
Supplies You’ll Need
I highly recommend starting with 13 mesh canvas instead of 18 mesh. The larger mesh is easier to count, easier on your eyes, stitches up faster, and honestly just more fun for beginners.
Here’s what I use:
- 13 mesh needlepoint canvas
- Tapestry needles
- Needlepoint thread/yarn - I use Merino Wool, heres some options from KC Needlepoint.
- Paint pen or fine-tip marker
- Velvet adhesive sheets
- Mat backing board
- E6000 glue
- Small clips or sewing clips
- Sharp scissors
- Optional: stretcher bars or clips for blocking
And if you want to get fancy with decorative stitches later, grab a needlepoint stitch guide book too. I used simple continental stitch for these bookmarks, but there are SO many beautiful options.

Step 1: Pick a Design
This is honestly the most fun part.
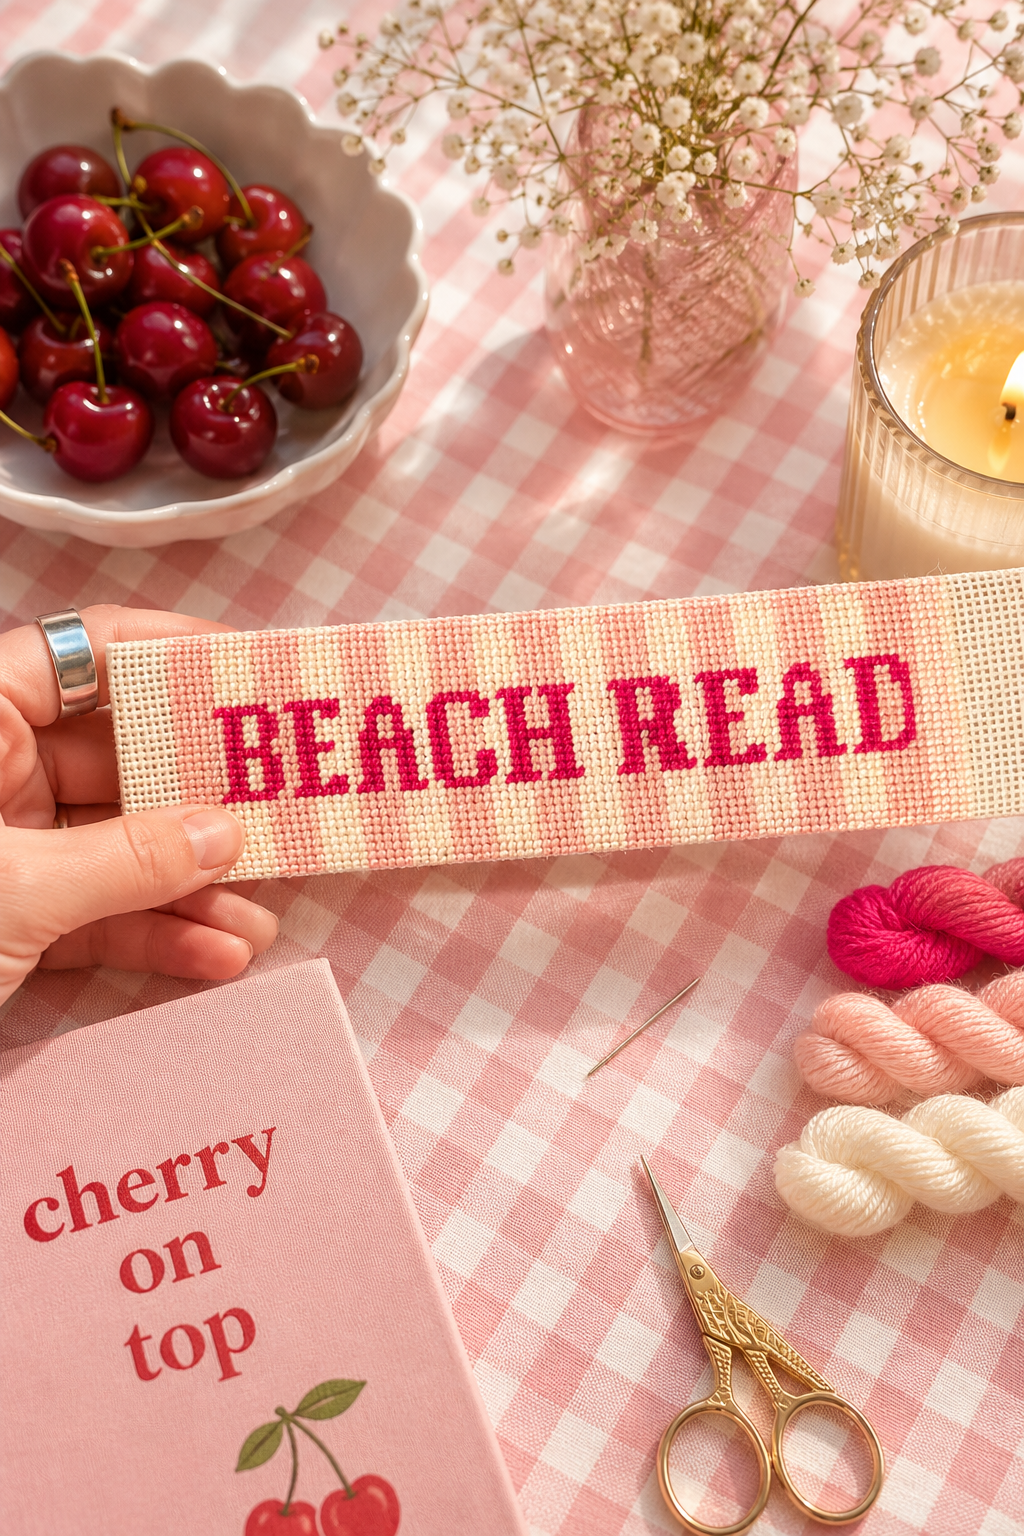
I usually scour Etsy and Pinterest for bookmark designs I can recreate through stitch counting. For the “Beach Read” bookmark, I found a painted canvas listing on Etsy and used a screenshot of the template as inspiration.
Instead of buying the pre-painted version, I count the stitches myself directly from the photo. It saves SO much money and lets you customize colors however you want.
Think:
- favorite books
- quotes
- gingham
- stripes
- cherries
- bows
- collegiate lettering
- cozy cabin vibes
- beachy pastels
The possibilities are endless. Thanks @FJNeedleworks on Etsy for this Inspiration!

Step 2: Gather Your Threads & Colors
Once I pick a design, I pull thread colors that match the vibe.
For my Beach Read bookmark I used:
- bright pink lettering
- pale blush stripes
- creamy ivory
- sparkly pink accent thread
This is where it starts feeling like a tiny art project.

Step 3: Mark the Design Before Stitching
This step changed EVERYTHING for me.
I use a paint pen to lightly mark:
- lettering crossings
- borders
- stripe changes
- anything complicated to count
This makes stitching SO much easier because you aren’t recounting every five seconds.
For lettering especially, I highly recommend mapping it out first.
Then I usually stitch:
- the words first
- stripes/background last
Doing the lettering first makes the stripes super easy to count around afterward.

Step 4: Start Stitching
I use continental stitch for most bookmarks because:
- it’s easy
- clean
- durable
- beginner friendly
Try not to stitch too tight or your canvas can warp.
The striped sections are honestly relaxing once you get into a rhythm.
And yes… poolside stitching absolutely improves the experience. ☀️📚

Step 5: Finish the Edges
Once the stitching is complete:
- do a binding stitch around the entire edge
- carefully cut triangles out of the corners to reduce bulk
- fold excess mesh behind the bookmark
- tack it down with spare thread
This helps create cleaner edges before backing.

Step 6: Block the Bookmark (If Needed)
Sometimes bookmarks warp slightly if stitches were too tight.
If yours isn’t staying rectangular:
- lightly block it
- gently stretch into shape
- clip or pin flat to dry
This step makes the final bookmark look SO much cleaner and more professional.

Step 7: Add the Velvet Backing
This is the magic step.
I cut mat backing board to the exact bookmark size, then:
- apply velvet adhesive sheets and fold it over the backing so the edges are velvet
- glue the stitched bookmark to the velvet backing using E6000
- clip everything together overnight
The clips help keep the edges crisp while drying.
And then… voila. ✨
A completely custom bookmark you made yourself.

Why I Love Doing It This Way
Painted canvases alone can run around $45 for custom bookmark type sizes, and that doesn’t even include thread or finishing supplies.
But buying the materials yourself lets you make:
- multiple bookmarks
- custom colorways
- personalized gifts
- trendy designs
- seasonal patterns
…for roughly the same overall investment.
Plus, it’s genuinely relaxing and addictive in the best way.
There’s something so satisfying about seeing a blank canvas slowly turn into something bookish and beautiful.
Final Thoughts

Needlepoint feels intimidating until you actually start.
But honestly? If you can count and follow a pattern, you can do this.
Start simple.
Pick colors you love.
Don’t worry about perfection.
And make something fun.
Now let’s get creative and make some bookmarks. ✨
And if you make one after reading this… PLEASE show me yours.
Tag us @paperandvinebooks on socials and show us your projects!
Also comment below if you laughed like I did at the backgrounds of these photos! HAHAHA
Talk about REAL LIFE happening around your projects!


